Podcaster Team Seats Overview
Last updated: May 29, 2026
Easy customizable access for everybody on your team!
Are you a professional podcaster or network that has a team to help produce your shows? Or maybe you just have a co-host and don’t want to share the same login credentials. No matter your size or specific needs, Team Seats allows you to add members to your RedCircle organization for better user management.
Each Team Seat comes with its own dedicated login. Each seat can be fully customized to the specific level of access desired for every member of your organization.
Currently, the Team Seats feature is only available for members on our Pro Plan or higher.
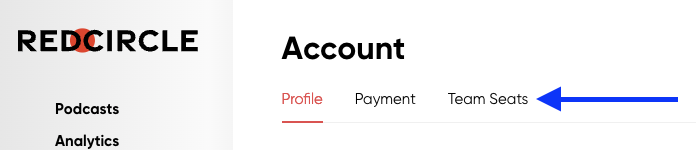
Where do I find the Team Seats Page?
Team Seats is located on the Account Page. Simply click the Team Seats tab near the top of the page:
You should see a screen similar to this:

This page allows you, the Org Owner, to manage all users on your team. Keep reading to learn how to add, customize, and remove members.
Adding a Team Seat
To add a person to a Team Seat, simply click on the Add Team Member button and enter in the person’s First and Last name and email address:
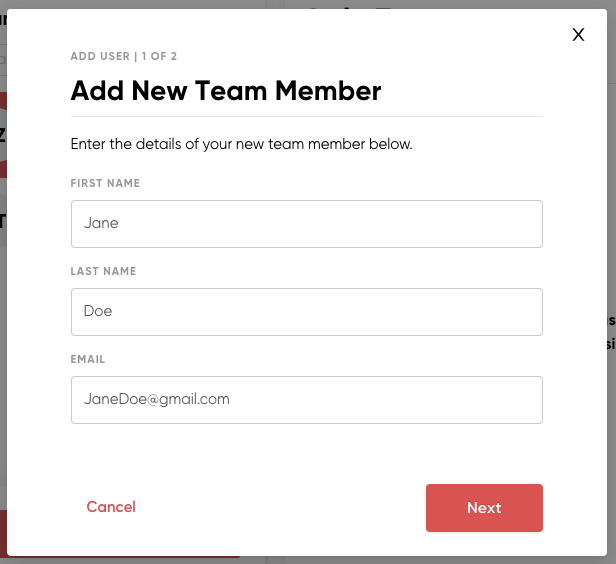
You cannot send a Team Seats invitation to someone who already has a RedCircle account. You must use either an alternative email address or email alias to invite them.
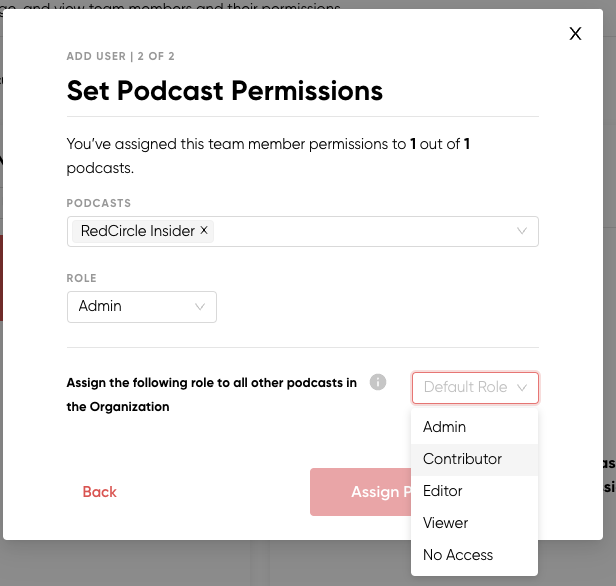
Click Next to be taken to the ‘Permissions’ page where you can determine what podcasts they can access, and what level they are able to access:
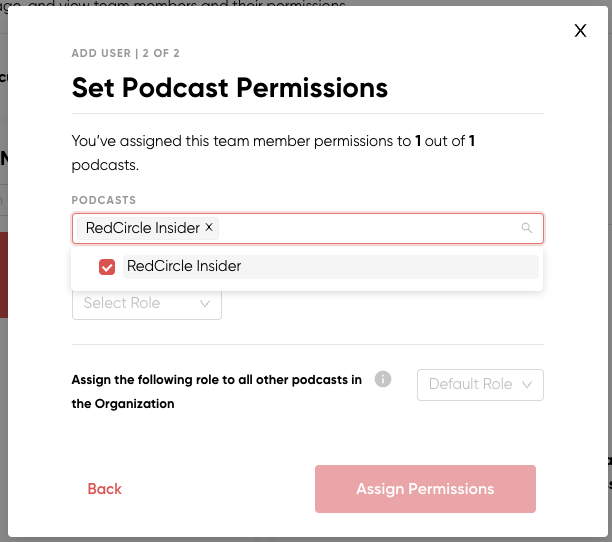
Select what shows you want this person to access.
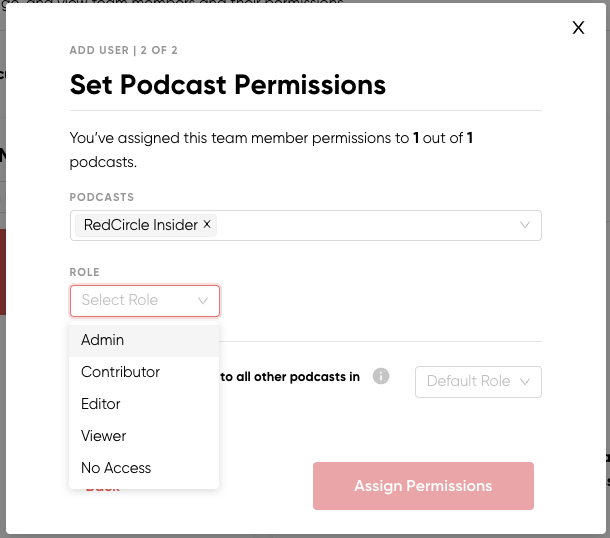
Select what role you wish to assign to this person. Roles are broken down into several categories:
- Admin: This person can view and edit almost every aspect of the podcast, view and edit monetization for the show, participate in Cross-Promotions, view and edit Dynamic Insertions for the show, view analytics, and edit permissions for other team members. It’s the highest level aside from Org Owner.
- Contributor: This person can view and edit the podcast, view monetization features (and revenue), view Cross-Promotions, view Dynamic Insertions, and view analytics.
- Editor: This person can view and edit almost every aspect of the podcast, and can view Dynamic Insertions.
- Viewer: This person can view the podcast and its episodes, view monetization features, view Cross-Promotions, view Dynamic Insertions, and view analytics.
- No Access: This person is completely unable to access the podcast.
For a full description of each role's permissions, please see Team Seats Permissions.
Each role can be customized to include more or less access to features. See the Customizing a Role section for more information.
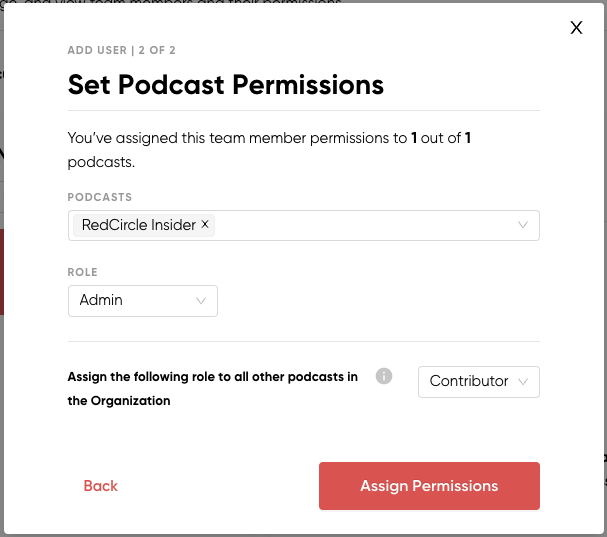
After selecting the role for the chosen podcast, you can assign the member a role for all other podcasts (if applicable.)
Finally, the Assign Permissions button should illuminate when all permissions have been set. Click that button to save all changes and send the email invitation to the person:
They should receive an invite to their email inbox shortly after saving. You can also see the status of the invite on the Team Seats page, on the right side of the screen.
Quick Example
Let’s say that you’re the Org Owner for a network on 10 podcasts. You want to add the host of ‘Show A’ as a Team Seat. When adding them to a Team Seat, select ‘Show A’ and assign them the Contributor role. You might then assign them the Viewer or No Access role for the rest of the shows on the network (9 in total). That level of access will even carry over to any new shows added to the Org Owner’s account.
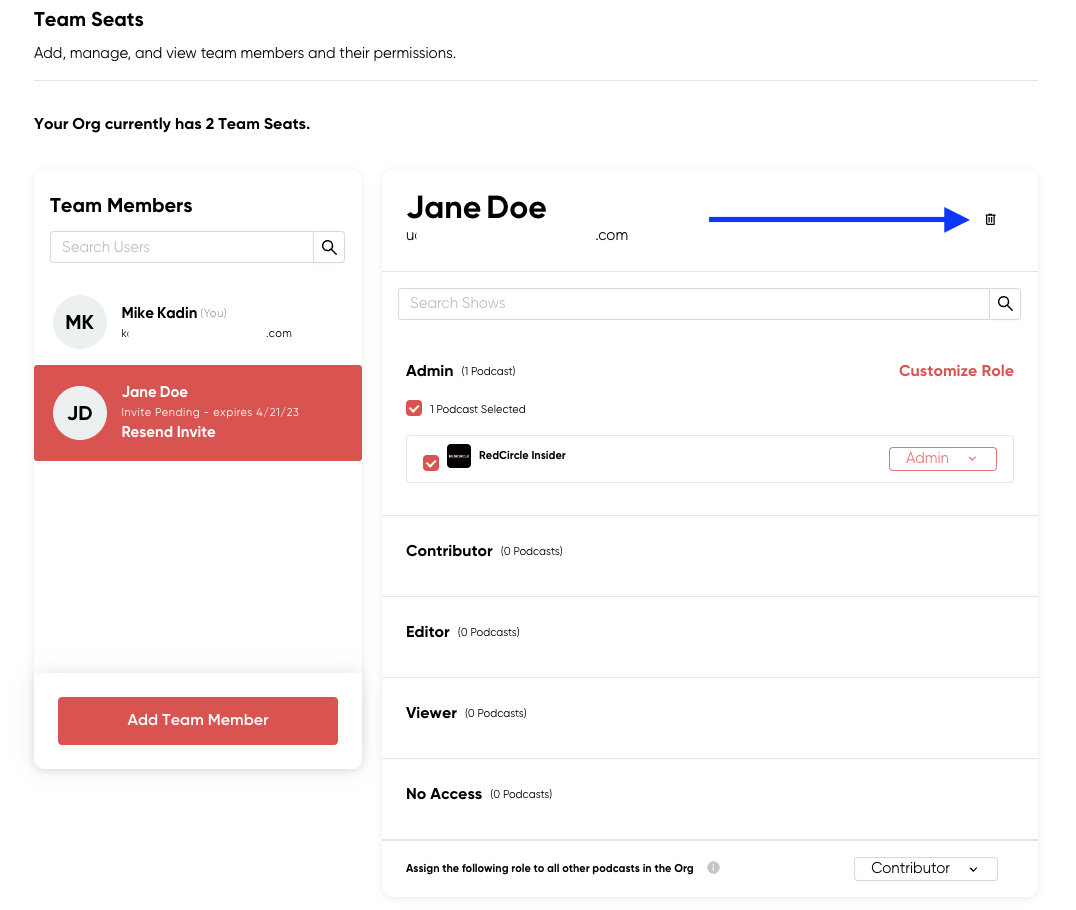
Updating a Team Seat
Need to change the level of access for a person? No problem! Simply navigate to the Team Seats page, click their name from the menu on the right, and click on the ‘roles’ drop-down menu:
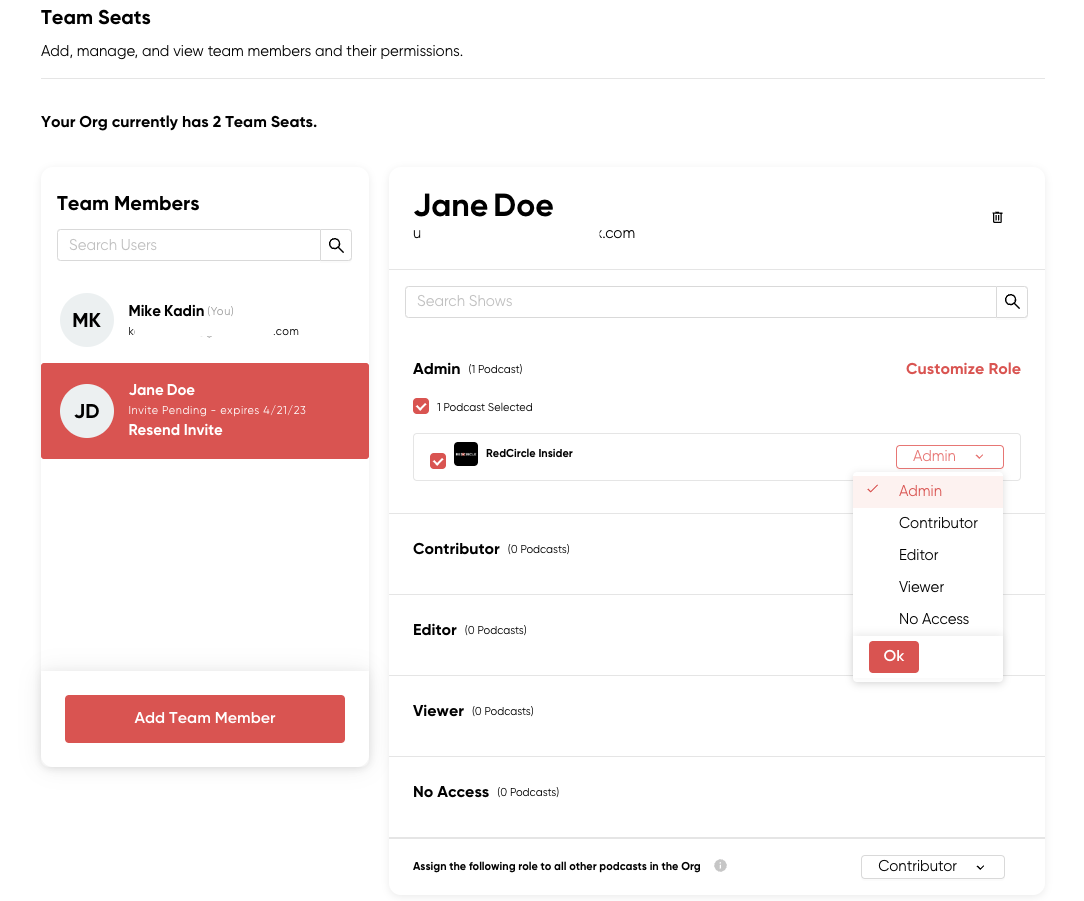
Select their new role from the drop-down and click Ok to save the changes.
Quick Example
Let’s say someone is assigned the Editor access for ‘Show A’ and you want to increase their level of access. You would click the drop-down next to ‘Show A’ and select a higher role like Contributor or Admin.
Alternatively, maybe you want to lower the access of a Team Seat, or remove access entirely. You would click the drop-down next to ‘Show A’ and select a lower role like Viewer, or No Access which removes all access to ‘Show A’ for that Team Seat.
If you change the role selected for the “Assign the following role to all other podcasts in the Organization” option, then any changes made apply to all existing shows in your network. This is true unless a role has been explicitly assigned to the Team Seat for other shows.
Customizing a Role
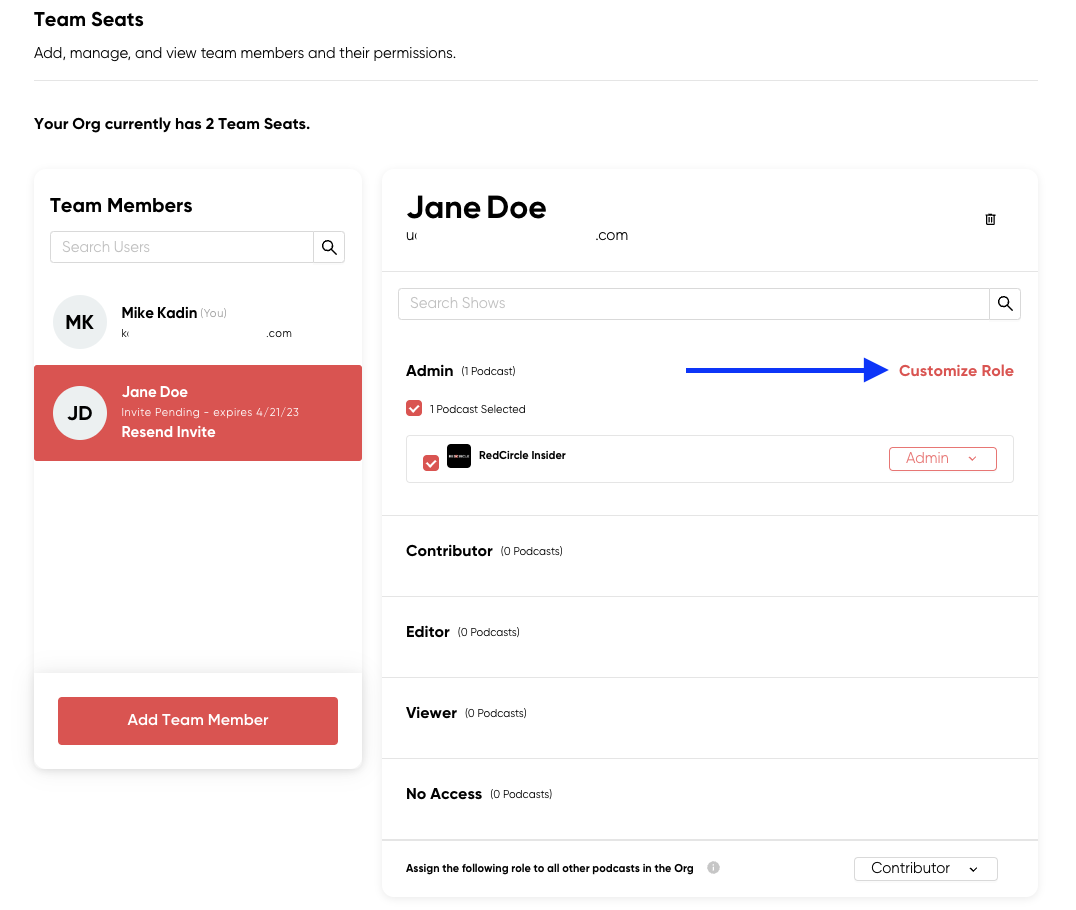
You can further customize a Team Seat’s role to allow for more or less access. To do so, navigate to the Team Seats page, click their name from the menu on the right, and click on the red Customize Role link:
Clicking that link should bring up the customize selection page:
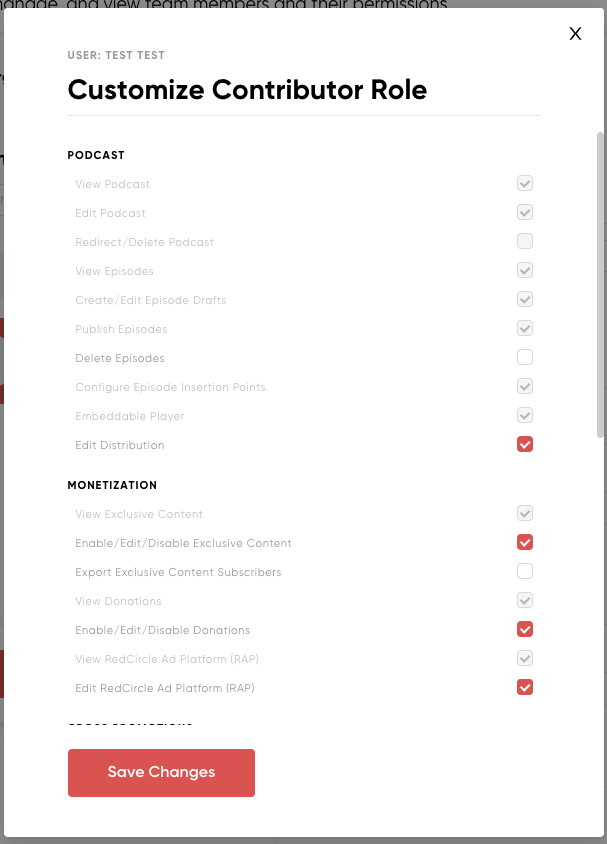
From there, you can check and uncheck specific access (though do note that some checkboxes are marked, or unmarked, by default and are therefore grayed out.) Don’t forget to click Save Changes before exiting!
Quick Example
Say you assigned the Editor role to a Team Seat but you don’t want this person to be able to publish episodes. You can customize their role further to remove that permission.
Removing a Team Seat
The process to remove a Team Seat is as simple as the rest! Navigate to the Team Seats page and click on the member you wish to remove. Then click the trash can icon near the top-right side of the page:
A pop-up appears asking if you wish to delete the user from your organization. Click Delete User to permanently remove them:

And that’s it! They’ll be removed immediately from your Team Seats.