The time has finally come to create your first episode with RedCircle! Whether you’re starting off with a brand-new podcast, or just freshly migrated from another host, this article is here to walk you through the steps of uploading your first episode.
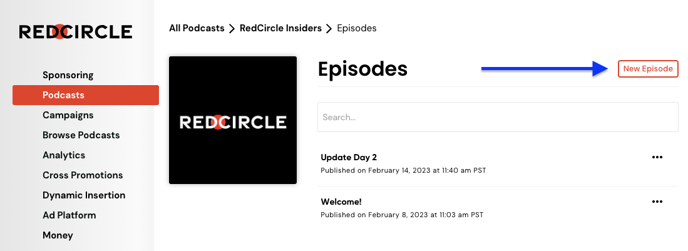
You first want to navigate to the Episodes page for your podcast. From there, click on the red New Episode button to the very right of the page:
Clicking that link brings up the Create Episode page:

You may have noticed that both the Save as Draft and Publish buttons are inactive in the example above. This is because the required information is missing from the page:
-
To Save as Draft, or Publish you need to enter something into the Title text field and into the Description text field. You also need to upload an audio file.
Let’s take a look at what each in the example image field means and requires:
- Title: This is the title of this specific episode. If you’re a serialized show, you may want to put a number to indicate which episode this is. (Note: If you also select an episode number from the ‘More Options’ section, then you may accidentally cause Apple Podcasts to show that number twice. For example, it may look like “1.1. Episode Title”)
- Description: Here you should place the details of your episode, any show notes you want to include, any links you want to share, and more. Keep in mind that this field renders everything in rich text. Rich text refers to bold, italics, hyperlinks, and other similar formatting options. So, no need to use HTML or other markup languages here. Some listening platforms may not support rich text (see Apple: Summary below for more information on text-only field options.)
- Episode Artwork: If you want your episode to have its own image, then be sure to upload one here. The image must be between 1400x1400 and 3000x3000 pixels. If you don’t upload an image here, then your show’s artwork will be the default for the various listening platforms.
- Upload MP3: This is where you upload your audio for the episode. We support only .mp3 and .m4a. Please convert any files to those formats before uploading. Depending on your file size, it may take a couple of minutes for the audio to process. Also, keep in mind that the maximum file size is 200MB (250MB if you’re on our Pro or Enterprise plans.) We recommend lowering the bitrate if the file size ends up being too large.
- Publish Date: Use this drop-down menu to set the date and time in which you want to publish the podcast. (Note: the time displayed correlates to the time set on your device.) Click on the calendar icon to pull up a calendar to select a date, and click on the clock icon to pick a time. Setting it to either the past or present makes it so the episode is published immediately after clicking the Publish button. Set the date/time to some time in the future to release the episode later on.
- Video: Depending on your plan level, you can generate a YouTube video of your episode and even have it publish automatically to your connected YouTube channel.
- Transcription: Depending on your plan level, you can generate a WebVTT transcription of your audio file.
If you click on the More Options link near the bottom of the page, then additional fields pop up:
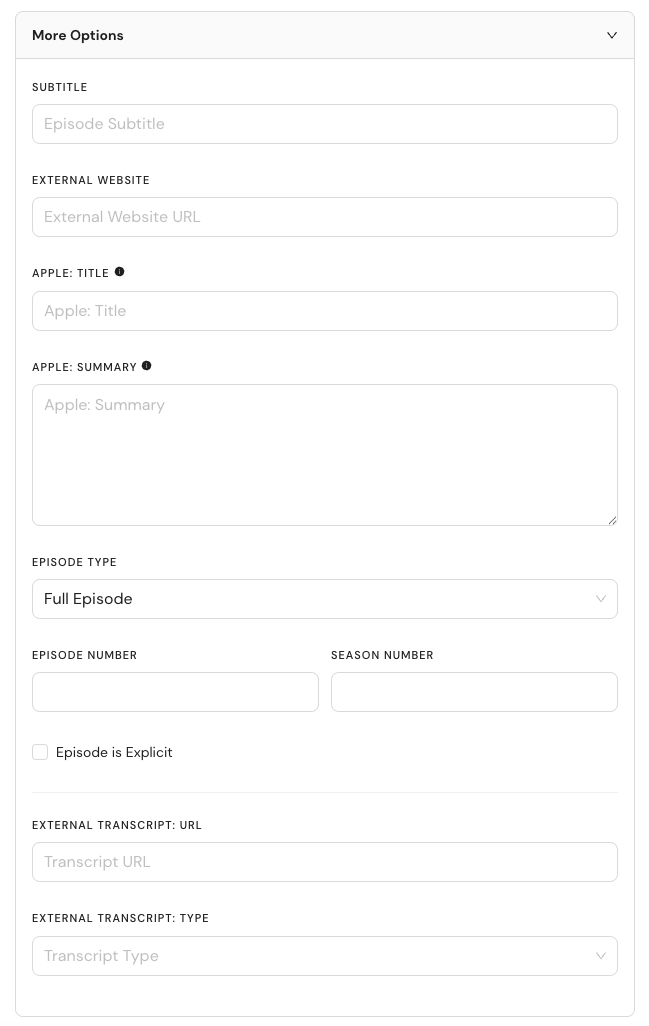
See below for more information on what each of these fields means and requires:
- Subtitle: You can use this field to write a short teaser about your episode for Apple Podcasts to display in various places on their platform.
- External Website: If you have a website for your podcast, or really any personal website you want to share, you can enter it here. The link appears on your Public Podcast Page as the “Podcast Website” button.
- Apple: Title: If you want to use a separate title within Apple Podcasts, you can specify an alternative title in this text field.
- Apple: Summary: This field is similar to the description field, but it doesn’t support rich text. Rich text refers to bold, italics, hyperlinks, and other similar formatting options. You would use this field to populate a text-only description for listening platforms that don’t support rich text such as Apple Podcasts. If this field is left blank, then RedCircle will generate one based on your Description field.
- Episode Type: This drop-down field allows you to select the type of episode you’re uploading. Types of episodes include ‘Full’, ‘Trailer’, and ‘Bonus’. This field is almost exclusively used by Apple Podcasts, which uses it to differentiate between different types of content. Most episodes would fall under the ‘Full’ category.
- Episode Number: Some listening platforms, such as Apple Podcasts, support episode numbering. You can choose to place the episode number here or in your title. We don’t usually recommend doing both as that may cause some issues with Apple Podcasts in particular.
- Season Number: Similar to Episode Number, you can group your episodes into seasons. However, most listening platforms do not group episodes by season.
- Episode is Explicit: This checkbox is required by Apple Podcasts so you can indicate whether or not your content is explicit. You should check this box if your content includes cursing, sensitive topics/content, adult themes, etc.
- Transcript URL: Enter the URL for your transcript page in this text field.
- Transcript Type: The "Transcript Type" depends on the Transcript URL you provide. So, if your transcript is written in HTML, then you would select HTML. JSON is similar to HTML as they're both coding languages. VTT is similar to video captions. And Plain Text is just like this message! No special coding needed.
Once you’ve entered all the information you need/want for your episode, you’re free to save it as a draft or publish it!
If you find that you need to make edits to the episode after publishing, then fret not! You can absolutely make any needed changes to the episode without disrupting its analytics or performance.
Having an issue uploading?
There could be any number of reasons that could be causing issues while attempting to upload your episode. To rule out some possibilities, please go through these troubleshooting steps before contacting Support:
- Clear your cache & cookies and refresh your browser
- Upload your episode using another internet connection and/or device
- Check that your mp3 file is playable
If none of these steps help to resolve the issue, then please reach out to Support for help. Be sure to provide us with your mp3 file so we can investigate.
Did you receive an error message stating "Cannot read properties of undefined (reading 'status')"?
This error message is typically caused by a corrupt or incorrect mp3 audio file. Examples include:
- A .wav file labeled as an .mp3 (changing .wav to .mp3 in the title does not change the audio file type).
- The file was not fully exported from your audio editing software before attempting upload.
One way to resolve this issue is to re-export the file, or run the audio file through a converter.
If the .mp3 audio file still doesn't upload, then please reach out to Support for help. Be sure to provide us with your mp3 file so we can investigate.
Want to share feedback or thoughts concerning our Help Center? Feel free to with our Help Center survey! All responses are appreciated! 😊