Insert audio clips into your show with Audio Blocks
Audio Blocks are the clips of audio that are dynamically inserted into your episodes through the use of Insertion Points. Depending on your plan, you can place default and custom Audio Blocks, both with Custom Audio clips, all throughout your podcast.
This article dives deeper into where to find Audio Blocks, how they work, and how to best use them to your advantage.
What are Audio Blocks?
How Do Audio Blocks Work with Insertion Points?
How Do I Create Custom Audio Clips & Custom Audio Blocks?
Bulk Assigning Audio Blocks
Further Resources
What are Audio Blocks?
Put simply, Audio Blocks house clips of audio that are played at the exact timestamp an Insertion Point is placed.
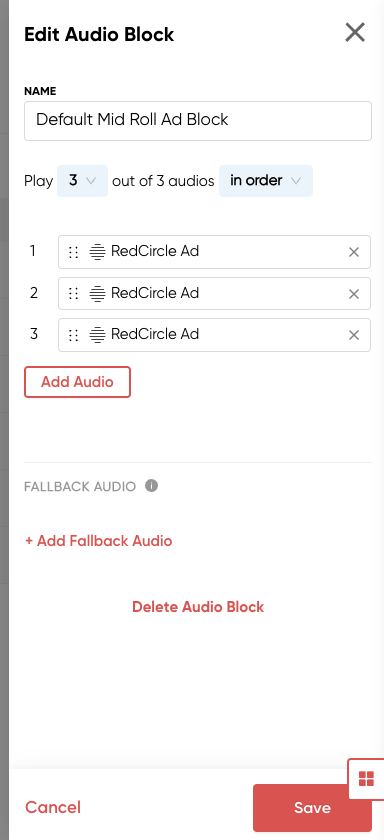
You may notice on the Dynamic Insertion page a few already-existing Audio Blocks. We automatically create the Default Pre & Post Roll Ad Block, the Default Mid Roll Ad Block, and the Default Cross Promotions Block when you opt in to RAP and the Cross-Promotions feature respectively:
The Default Pre & Post Roll Ad Block defaults to playing up to 2 RAP ads (Programmatic and Host-Read) back-to-back depending on available inventory. And the Default Mid Roll Ad Block defaults to playing up to 3 RAP ads (Programmatic and Host-Read) back-to-back depending on available inventory.
The Default Cross Promotions Block defaults to playing up to 2 Cross-Promotional ads back-to-back depending on active campaigns. For example, if you only have one Cross-Promotion going on, then that promotional ad only runs once.
All of these default Audio Blocks can be edited. You can add Custom Audio clips, Fallback Audio, remove any clips, change the play order, increase or decrease the number of clips played, and really customize it!
Members on the Growth Plan or higher have the ability to create Custom Audio clips and Custom Audio Blocks for things like intros/outros, special announcements, off-platform ad campaigns, and more. More on that later!
How Do Audio Blocks Work with Insertion Points?
Audio Blocks and Insertion Points are intimately tied. They can’t really work without the other. The most typical use of Audio Blocks and Insertion Points are for ads procured through RAP (the RedCircle Ad Platform).
For example, let’s say you opted-in to RAP and are ready to start monetizing. You would first place Insertion Points at specific spots within your episode. Next, you would assign the Default Pre & Post Roll Ad Block and the Default Mid Roll Ad Block to one or more of those recently-placed Insertion Points.
Every time someone tunes in to your show, our system checks whether or not there’s an Insertion Point and adds in the audio for that listener. If you placed a Pre-Roll Insertion Point at the 00:01:00 (one minute) timestamp and assigned the Default Pre & Post Roll Ad Block, then the listener should hear either a Programmatic (pre-recorded) or a Host-Read Ad at that exact timestamp.
We dynamically insert based on your active campaigns and available inventory. (See our Insertion Points Help article for a more detailed look at how this works.)
Whatever Audio Block you assign to an Insertion Point plays at the exact moment the Insertion Point is placed in your episode.
How Do I Create Custom Audio Clips & Custom Audio Blocks?
If you’re a member on the Growth Plan or higher, then you can create custom Audio Clips and custom Audio Blocks for any audio you want to dynamically insert in your episode(s).
Navigate to the Dynamic Insertion page to get started. You should notice two tabs near the top: Custom Audio and Audio Blocks.
Create Custom Audio Clips
To create a custom Audio Block, you first need to create Custom Audio. Click on the red Add New Audio button near the top-right side of the page. The audio creation widget should pop up on the right side:
Members on the Pro and Enterprise Plans are able to add Tracking Pixel URLs, set Start and End Dates, and input a Download Cap:
Don’t forget to click Save so the audio clip is created!
Custom Audio Clips populate in your personal Custom Audio Library:
Once the Audio Clips are created, the next step is to assign them to custom Audio Blocks!
We also have a video demonstrating how to create your very own custom Audio Clips!
Create Custom Audio Blocks
Similar to the Custom Audio page, simply click on the red Add New Audio Block button located near the top-right:
The Audio Block creation widget should pop up on the right side of the screen. Enter the name of the Audio Block, add the desired audio clip, and select the desired play style.
A play style controls the order in which 2 or more Audio Clips are played within that Audio Block. You can set it up be “in order”, meaning the clips are played sequentially until the ‘play up to’ number is reached. Or, you can set it to “random”, meaning the clips are played in a totally random order until the ‘play up to’ number is reached.
‘Play up to’ refers to the number of Audio Clips that are played within the Audio Block. You can set it for 1, 2, or more. We don’t recommend adding more than 3 Audio Clips to an Audio Block at maximum. You don’t want to overwhelm your listeners with a ton of back-to-back ads and/or promotional clips!
You also have the option to add Fallback Audio, which is an Audio Clip that plays should the desired Audio Clip not be available.
Always be sure to click that Save button before exiting!
The newly created Audio Block should then populate on the Audio Blocks tab:
We also have a video demonstrating how to create your very own custom Audio Blocks!
Assign Audio Blocks to Insertion Points
The final step is to assign the Audio Block to one or more of the episodes of your podcast. To do so, navigate to the Audio Blocks tab and click on the three dots (...) next to the desired Audio Block. Select Assign to Insertion Points from the drop-down menu:
This brings up the Bulk Assign window, which allows you to assign one Audio Block to multiple Insertion Points. Select your show from the drop-down menu:
Then assign the Audio Block to whatever Insertion Points you want!
Be sure to click on the red Submit button to finalize and save your Insertion Point selection.
Bulk Assigning Audio Blocks
As seen above, you can assign an Audio Block (both custom and default) to multiple Insertion Points all at once. This is known as “bulk assigning”. Utilizing this feature saves you a ton of time when creating and editing Audio Blocks.
As shown above, you can get to this screen by navigating to the Audio Blocks tab and clicking on the three dots (...) next to the desired Audio Block. Then, select Assign to Insertion Points from the drop-down menu.
Select your show from the drop-down menu to pull up the Insertion Points. You can assign the Audio Block to already-existing Insertion Points after selecting your show.
You may notice drop-downs with “Pre-Roll”, “Mid-Roll”, and “Post-Roll” titles. Clicking on those drop-downs brings up a list of options.
See below for what each option means:
- First: This refers to the very first Insertion Point in the episode. So, if you have two Insertion Points in Pre-Roll, this refers to the one that's in the first position.
- First Available: This refers to the first Insertion Point available in the episode. So, say you have one Insertion Point at 00:00:00 and another Insertion Point at 00:01:02. If the Insertion Point at 00:00:00 already has an Audio Block assigned to it, then clicking First Available would assign to it the 00:01:02 spot.
- Last: This refers to the very last Insertion Point in the episode.
- Last Available: Similar to First Available, clicking this assigns the Audio Block to the last Insertion Point that's available/open. So, say you have one Insertion Point at 00:30:00 and another at 00:28:10. If the Insertion Point at 00:30:00 already has an Audio Block assigned to it, then clicking Last Available would assign to it the 00:28:10 spot.
- All: This option assigns the Audio Block to all Insertion Points in that audio area in every episode. For example, if you click ‘All’ in the Pre-Roll drop-down, then all Insertion Points in the Pre-Roll spot will be assigned that Audio Block.
- Unassign: This option unassigns the Audio Block from all Insertion Points in that audio area in every episode. For example, if you click Unassign in the Pre-Roll drop-down, then all Insertion Points in the Pre-Roll spot are removed from that Audio Block.
As for the checkmark boxes, the faint red line indicates that an Audio Block is already assigned to it. So, if you click All, then it overwrites the Audio Block that is already assigned. However, if you click First Available, then it assigns the Audio Block to the first available spot.
Further Resources
Now that you have a better understanding of Audio Blocks, you may want to read over these articles to complete your arsenal of Dynamic Insertion knowledge:
- Read more about Insertion Points and their role within Dynamic Insertion.
- Learn how to make Dynamic Insertion work for you with our Dynamic Insertion Cookbook.
- Ready to start monetizing? See Dynamic Insertion for the RedCircle Ad Platform (RAP) to understand how our Dynamic Insertion technology works with our Advertising Platform.
- If you’re having some trouble with Dynamic Insertion, then look through Troubleshooting Dynamic Insertion Help article for tips and tricks.